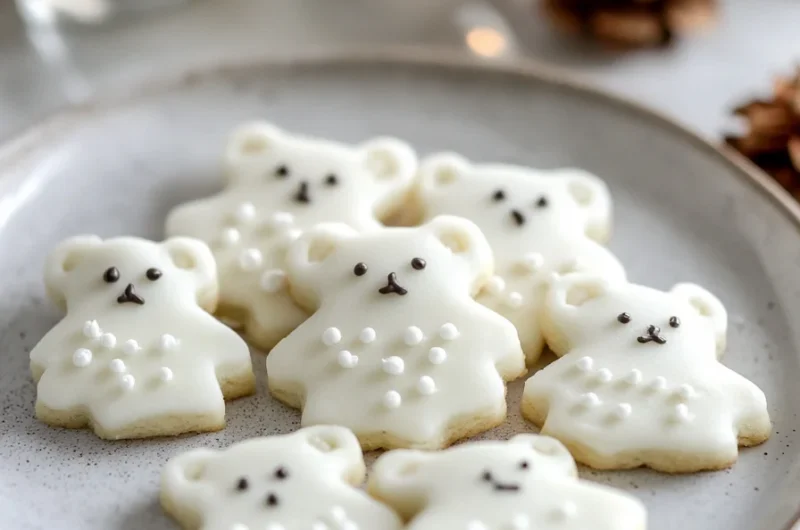
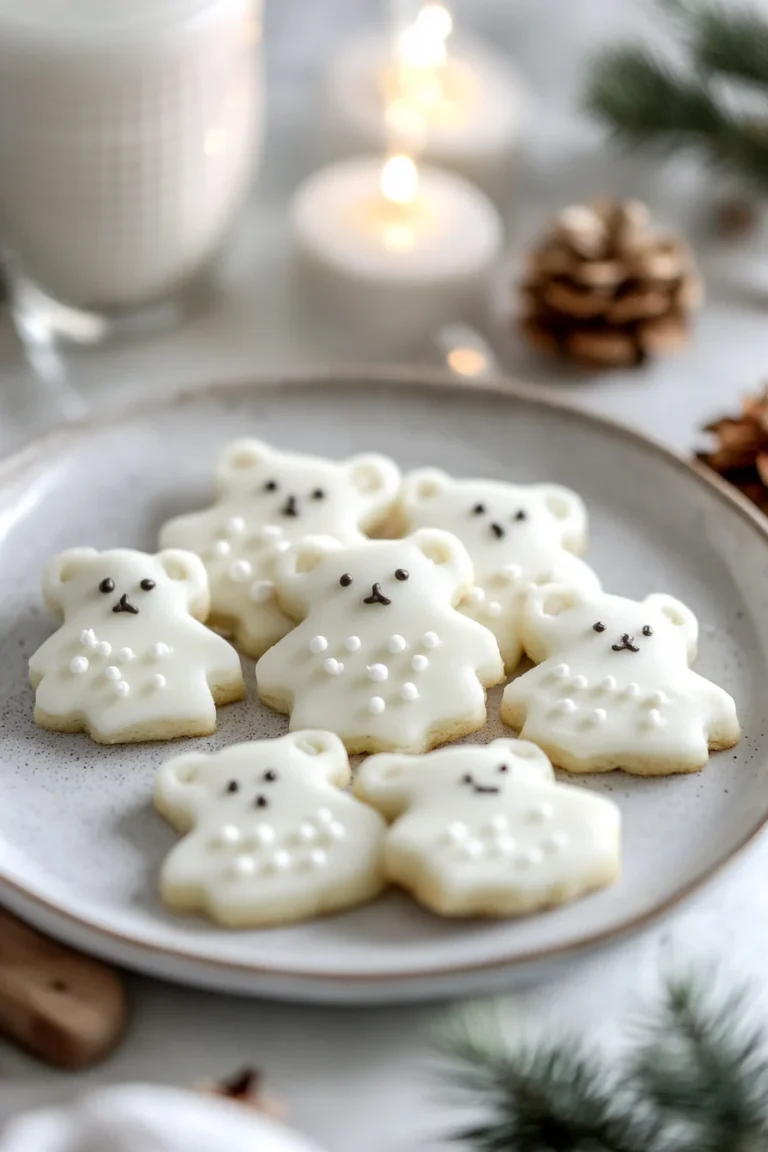
Polar Bear Cookies are a delightful treat that will brighten any gathering. With their adorable design and incredible flavors, these cookies are perfect for holidays, birthday parties, or just a fun afternoon activity with family. Not only are they visually appealing, but they are also scrumptiously sweet, making them a hit with both kids and adults alike.
At first glance, you might think Polar Bear Cookies are complicated to make, but they are surprisingly simple! This recipe provides an enjoyable baking experience that culminates in delicious cookies shaped like cute little bears. Each bite is a combination of soft sweetness, creaminess from the frosting, and creativity in every design. Whether you’re an experienced baker or just starting in the kitchen, you’ll love crafting these amazing treats.
Following this guide, you’ll discover everything there is to know about creating Polar Bear Cookies. With satisfying instructions and helpful tips, you’ll soon be serving up this incredible dessert to family and friends. So gather your ingredients, and let’s embark on this cookie-baking adventure!
Why You’ll Love This Recipe
There are countless reasons to adore Polar Bear Cookies. Their unique design, delicious taste, and fun preparation make them a wonderful choice for various occasions. Here are a few reasons you’ll want to bake these cookies:
1. Fun to Make: Decorating these cookies is a creative and enjoyable process. You can involve kids or friends for a fun group activity.
2. Adorable Presentation: The polar bear design looks impressive and will dazzle your guests at any gathering.
3. Customizable Flavors: You can easily tweak the flavors of the cookie and frosting to suit your taste preferences.
4. Perfect for Any Occasion: Be it holidays, birthdays, or casual gatherings, Polar Bear Cookies fit right in.
5. Great for Gifting: Pack them in a cute box or tin and share them with friends and family; they make a wonderful homemade gift.
6. Easy to Follow: With detailed instructions and simple steps, even novice bakers can achieve delicious results.
These remarkable aspects of Polar Bear Cookies ensure that they will quickly become a loved recipe in your collection. Once you try them, you’ll understand why so many people rave about this delightful treat!
Preparation and Cooking Time
Creating Polar Bear Cookies is straightforward and doesn’t take too long. Below is a breakdown of the time you will need for preparing and baking these adorable treats:
– Preparation Time: 30 minutes
– Cooking Time: 10-12 minutes
– Cooling Time: 20 minutes (for frosting)
This gives you a total of approximately 1 hour of fun baking time to create these fantastic cookies.
Ingredients
– 2 ½ cups all-purpose flour
– 1 teaspoon baking powder
– ½ teaspoon baking soda
– ½ teaspoon salt
– 1 cup unsalted butter, softened
– 1 cup granulated sugar
– 1 cup powdered sugar
– 1 large egg
– 2 teaspoons vanilla extract
– ½ teaspoon almond extract
– 1 cup white chocolate chips
– 1 cup mini chocolate chips (for decoration)
– Black frosting or edible markers (for eyes and nose)
– Optional: coconut flakes or powdered sugar (for a snowy effect)
Step-by-Step Instructions
Creating Polar Bear Cookies can be simple if you follow these easy steps:
1. Preheat Oven: Preheat your oven to 350°F (175°C).
2. Mix Dry Ingredients: In a medium bowl, whisk together the flour, baking powder, baking soda, and salt. Set aside.
3. Cream Butter and Sugars: In a large bowl, cream the softened butter, granulated sugar, and powdered sugar until light and fluffy.
4. Add Egg and Extracts: Beat in the egg, vanilla extract, and almond extract until well combined.
5. Combine Mixtures: Gradually add the dry mixture to the wet ingredients, mixing until just combined. Be careful not to overmix.
6. Fold in White Chocolate Chips: Gently fold in the white chocolate chips until evenly distributed.
7. Chill Dough: Cover the dough with plastic wrap and refrigerate for about 30 minutes. This will make it easier to handle.
8. Shape Cookies: Once chilled, scoop small balls of dough and shape them into polar bear forms. Flatten them slightly before placing them on a baking tray lined with parchment paper.
9. Bake: Bake in the preheated oven for 10-12 minutes until lightly golden around the edges. Allow them to cool for a few minutes on the tray before transferring them to wire racks.
10. Frosting: After the cookies have completely cooled, decorate with frosting or edible markers to create the bears’ eyes and nose. You can also roll them in coconut flakes or dust powdered sugar for a snowy effect.
11. Add Mini Chocolate Chips: Use mini chocolate chips to create the ears and other decorations for your polar bears.
These easy-to-follow steps will have you whipping up a batch of Polar Bear Cookies in no time!
How to Serve
When it comes to serving Polar Bear Cookies, presentation matters! Here are a few ideas to enhance your serving experience:
1. Cookie Platter: Arrange the cookies on a large decorative platter. A contrast of colors adds visual appeal.
2. Themed Decorations: Consider using blue and white plates or tablecloths to match the polar bear theme and enhance the visual excitement.
3. Pair with Drinks: Serve the cookies with hot chocolate, milk, or coffee to create a cozy atmosphere.
4. Gift Packaging: If gifting, place the cookies in a decorative box or bag and add some festive ribbon for a charming touch.
5. Accessibility: Provide napkins and plates for easy enjoyment, especially if serving at a gathering.
6. Optional Garnishes: Sprinkle some edible glitter or coconut flakes on top for a winter wonderland feel.
With these serving suggestions, your Polar Bear Cookies will not only taste amazing but also look incredible on any table! Enjoy the smiles and compliments that come with these delightful creations.
Additional Tips
– Use Fresh Ingredients: To enhance the flavors of your Polar Bear Cookies, select fresh ingredients, especially eggs and extracts.
– Experiment with Texture: If you prefer crunchier cookies, try adding some chopped nuts or oats to the dough.
– Create Different Designs: Get creative with your Polar Bear Cookies. You can use icing to add scarves, hats, or other decorations that suit the occasion.
– Make a Batch for Different Occasions: Polar Bear Cookies can be adapted for various events by adjusting their decorations. Consider red and green for Christmas or pastel colors for Easter.
– Serve with a Cookie Bar: To make it a fun event, set up a cookie decoration station with various toppings for friends and family to customize their Polar Bear Cookies.
Recipe Variation
Feel free to switch things up! Here are some delightful variations you could try:
1. Chocolate Version: Incorporate cocoa powder into the dough for a rich chocolate flavor, perfect for chocolate lovers.
2. Different Frosting Choices: Instead of white frosting, opt for a cream cheese frosting for a tangy twist.
3. Seasonal Colors: Customize the icing colors based on the season. Use orange and brown for autumn or pink and white for Valentine’s Day.
4. Add Sprinkles: Enhance the festive element by adding colorful sprinkles on top of the frosted cookies.
5. Nutty Alternative: Incorporate almond flour or finely chopped nuts into the dough for an added crunch and flavor.
Freezing and Storage
– Storage: Keep your Polar Bear Cookies in an airtight container at room temperature for up to a week. This helps retain their soft texture.
– Freezing: You can freeze the unbaked dough for up to three months. Just scoop out the dough balls, place them on a baking sheet, freeze until solid, then transfer to a freezer-safe bag. Bake straight from the freezer, adding a minute or two to the baking time.
– Frosting Storage: If you have leftover frosting, store it in the refrigerator for up to a week. Allow it to come to room temperature before using it again.
Special Equipment
To make your Polar Bear Cookies, you won’t need much specialized equipment, but a few items will help:
– Mixing Bowls: Use multiple mixing bowls for combining wet and dry ingredients efficiently.
– Baking Tray: A good quality baking tray lined with parchment paper ensures your cookies do not stick and bake evenly.
– Cookie Scoop: For uniform cookie sizes, a cookie scoop works wonders and gives consistent results.
– Piping Bags: For decorating your cookies, piping bags can help create beautiful designs and add finer details.
– Cooling Rack: To cool your cookies properly after baking, use a cooling rack to ensure they maintain their texture.
Frequently Asked Questions
Can I make Polar Bear Cookies gluten-free?
Absolutely! Substitute the all-purpose flour with a gluten-free flour blend for a gluten-free option.
How do I know when my cookies are done baking?
Cookies should be lightly golden around the edges but still look a bit soft in the center when done.
Can I decorate these cookies ahead of time?
Yes, you can bake the cookies in advance and decorate them a day before serving to save time.
What if I don’t have almond extract?
You can either omit it or substitute with more vanilla extract for a slightly different flavor profile.
Can I use chocolate frosting instead of white?
Definitely! Chocolate frosting can add a delicious twist to your Polar Bear Cookies and make them even more irresistible.
Conclusion
Polar Bear Cookies are the perfect blend of fun, flavor, and festivity. Their adorable design will be a hit at any gathering, and their delicious taste is bound to impress everyone. With customizable flavors and easy-to-follow steps, baking these cookies can be a delightful experience for both kids and adults. Whether you’re serving them at a holiday party or simply enjoying a cozy afternoon with the family, these Polar Bear Cookies will surely become a favorite in your baking repertoire!
Polar Bear Cookies: An Incredible Ultimate Recipe
- Total Time: 22 minute
Ingredients
– 2 ½ cups all-purpose flour
– 1 teaspoon baking powder
– ½ teaspoon baking soda
– ½ teaspoon salt
– 1 cup unsalted butter, softened
– 1 cup granulated sugar
– 1 cup powdered sugar
– 1 large egg
– 2 teaspoons vanilla extract
– ½ teaspoon almond extract
– 1 cup white chocolate chips
– 1 cup mini chocolate chips (for decoration)
– Black frosting or edible markers (for eyes and nose)
– Optional: coconut flakes or powdered sugar (for a snowy effect)
Instructions
Creating Polar Bear Cookies can be simple if you follow these easy steps:
1. Preheat Oven: Preheat your oven to 350°F (175°C).
2. Mix Dry Ingredients: In a medium bowl, whisk together the flour, baking powder, baking soda, and salt. Set aside.
3. Cream Butter and Sugars: In a large bowl, cream the softened butter, granulated sugar, and powdered sugar until light and fluffy.
4. Add Egg and Extracts: Beat in the egg, vanilla extract, and almond extract until well combined.
5. Combine Mixtures: Gradually add the dry mixture to the wet ingredients, mixing until just combined. Be careful not to overmix.
6. Fold in White Chocolate Chips: Gently fold in the white chocolate chips until evenly distributed.
7. Chill Dough: Cover the dough with plastic wrap and refrigerate for about 30 minutes. This will make it easier to handle.
8. Shape Cookies: Once chilled, scoop small balls of dough and shape them into polar bear forms. Flatten them slightly before placing them on a baking tray lined with parchment paper.
9. Bake: Bake in the preheated oven for 10-12 minutes until lightly golden around the edges. Allow them to cool for a few minutes on the tray before transferring them to wire racks.
10. Frosting: After the cookies have completely cooled, decorate with frosting or edible markers to create the bears’ eyes and nose. You can also roll them in coconut flakes or dust powdered sugar for a snowy effect.
11. Add Mini Chocolate Chips: Use mini chocolate chips to create the ears and other decorations for your polar bears.
These easy-to-follow steps will have you whipping up a batch of Polar Bear Cookies in no time!
- Prep Time: 15 minutes
- Cook Time: 10-12 minutes
Nutrition
- Serving Size: 24 cookies
- Calories: 150 kcal per cookie
- Fat: 7g
- Protein: 1g