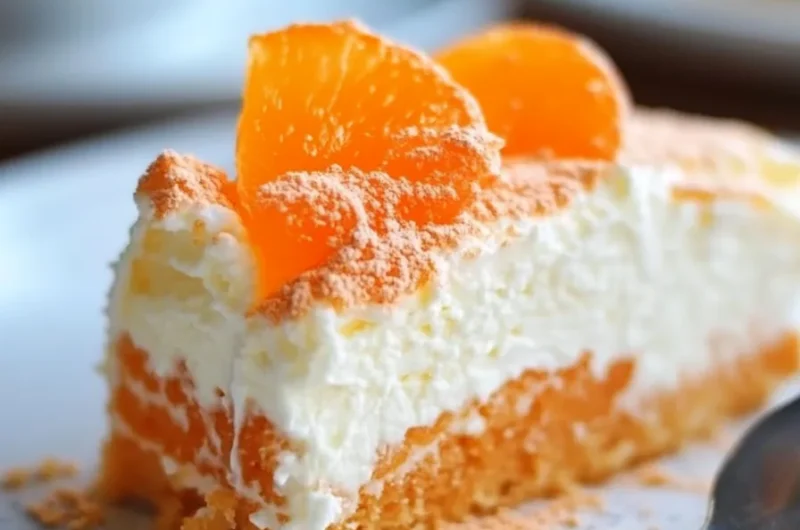
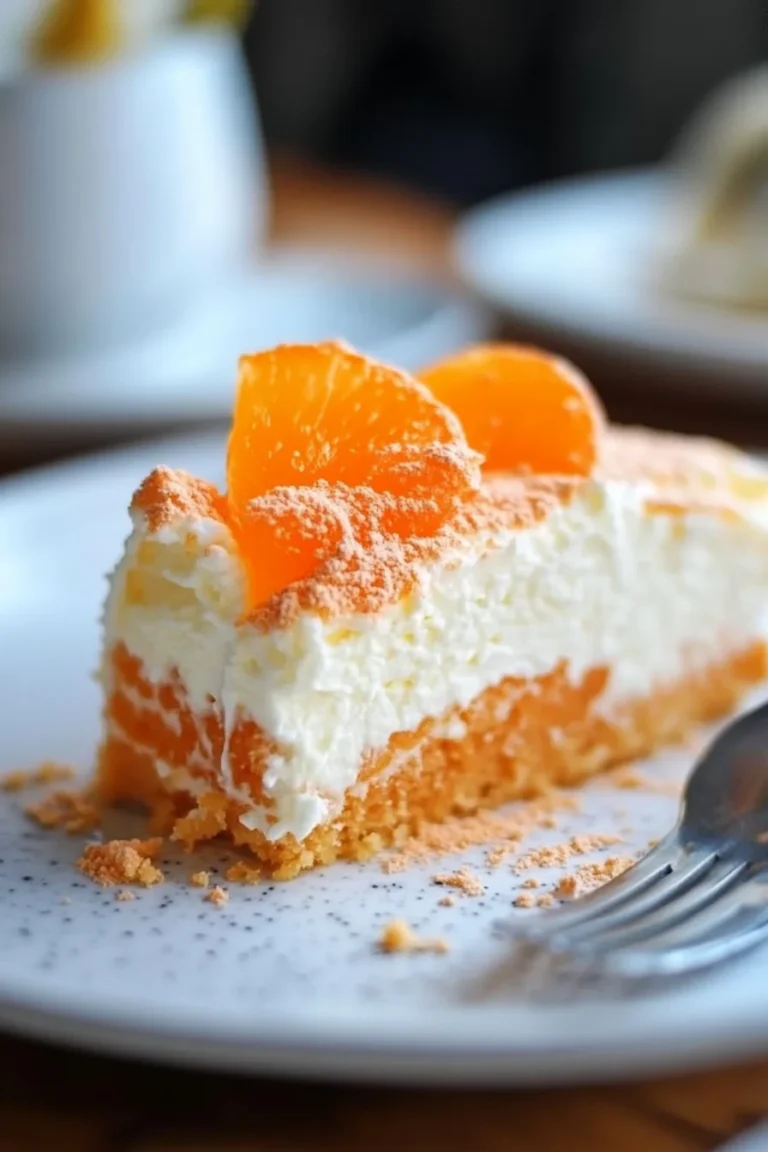
Orange Creamsicle Cake is a delightful dessert that captures the nostalgic taste of your favorite childhood treat. This cake, with its combination of zesty orange and creamy vanilla flavors, is not just another dessert; it’s an experience that brings joy and excitement to any gathering. Every bite transports you to sunny days filled with laughter and carefree moments. If you’re a fan of fruity, creamy delights, this cake will quickly become a staple in your baking repertoire.
Imagine the aroma of fresh orange zest mixing with vanilla buttercream, creating an irresistible invitation for your taste buds. Friends and family will undoubtedly be amazed by this stunning cake at your next event, whether it’s a birthday party, picnic, or casual gathering. The Orange Creamsicle Cake is a crowd-pleaser that brings a smile to everyone’s face. Let’s dive into what makes this dessert so special and how you can recreate it in your kitchen.
If you’re unsure about baking or feel overwhelmed, don’t worry—this amazing recipe is designed for anyone, from beginners to experienced bakers. The steps are straightforward and allow for creativity along the way. With vibrant color and equally delicious flavors, this cake is likely to be the star of your dessert table. Ready to learn more? Let’s explore why this Orange Creamsicle Cake is bound to win over hearts (and taste buds) everywhere.
Why You’ll Love This Recipe
The Orange Creamsicle Cake brings unique elements together, making it a top choice for many occasions. Here’s why you’ll absolutely love this amazing recipe:
1. Nostalgic Flavor: The combination of orange and vanilla is reminiscent of the classic creamsicle popsicle, creating a nostalgic dessert experience.
2. Visual Appeal: With its bright orange hues and rich frosting, this cake makes for an eye-catching centerpiece. It’s perfect for celebrations.
3. Simple Ingredients: Most ingredients are common pantry staples, ensuring you won’t have to hunt for anything special.
4. Versatile Recipe: This cake can be adjusted in various ways, such as using gluten-free flour or adding different fruit flavors.
5. Easy to Follow: The step-by-step instructions make this recipe easy to follow, no matter your baking skill level.
6. Perfect for Any Occasion: Suitable for birthdays, picnics, and potlucks, this cake is versatile and suitable for any event.
These are just a few reasons why so many people love the Orange Creamsicle Cake. Each element harmonizes beautifully, creating a delightful dessert that everyone will rave about.
Preparation and Cooking Time
To create the Orange Creamsicle Cake, you need to manage your time effectively. Here’s an overview of the preparation and cooking timeline:
– Preparation Time: 30 minutes
– Cooking Time: 25-30 minutes
– Cooling Time: 15-20 minutes
– Frosting Time: 10 minutes
Overall, expect the process to take about 1 hour and 15 minutes from start to finish. These times can vary slightly based on your familiarity with the recipe and your kitchen setup, but this outline should give you a good framework to work within.
Ingredients
– 2 ½ cups all-purpose flour
– 2 teaspoons baking powder
– ½ teaspoon salt
– 1 cup unsalted butter, softened
– 2 cups granulated sugar
– 4 large eggs
– 1 tablespoon grated orange zest
– 1 tablespoon vanilla extract
– 1 cup whole milk
– 1 ½ cups powdered sugar (for frosting)
– ½ cup unsweetened orange juice
– 1 cup butter, softened (for frosting)
– 2 teaspoons vanilla extract (for frosting)
– Orange slices and zest for garnish (optional)
Step-by-Step Instructions
Creating the Orange Creamsicle Cake is straightforward if you follow these simple steps:
1. Preheat Oven: Begin by preheating your oven to 350°F (175°C). Grease and flour two 9-inch round cake pans.
2. Mix Dry Ingredients: In a bowl, whisk together the all-purpose flour, baking powder, and salt.
3. Cream Butter and Sugar: In a large mixing bowl, beat the softened butter and granulated sugar together until light and fluffy.
4. Add Eggs: Add the eggs one at a time, mixing well after each addition. Incorporate the orange zest and vanilla extract.
5. Combine Mixtures: Gradually add the dry ingredients to the butter mixture, alternating with the milk. Mix until just combined.
6. Pour Batter: Divide the cake batter evenly between the prepared pans.
7. Bake: Place the pans in the preheated oven and bake for 25-30 minutes, or until a toothpick inserted in the center comes out clean.
8. Cool: Remove the cakes from the oven and let them cool in the pans for 10 minutes. Then, transfer them to wire racks to cool completely.
9. Prepare Frosting: In a separate bowl, whip the softened butter until creamy. Gradually add powdered sugar, orange juice, and vanilla extract, mixing until smooth.
10. Frost the Cake: Once the cakes are cool, spread frosting between the layers and on top. Use a spatula to create an even layer.
11. Decorate: Garnish the cake with orange slices and additional orange zest, if desired.
By following these steps, you will create a delicious and visually stunning Orange Creamsicle Cake that everyone will enjoy.
How to Serve
Presenting your Orange Creamsicle Cake is a vital part of the experience. Here are some suggestions for serving:
1. Serving Plate: Use an attractive cake stand to elevate the presentation and make a statement.
2. Slice Size: Offer generous yet manageable slices, allowing guests to enjoy a second helping without feeling overwhelmed.
3. Add Compliments: Consider pairing with fresh whipped cream, a scoop of vanilla ice cream, or sliced strawberries for an unforgettable taste combination.
4. Beverage Pairing: Serve with a refreshing glass of lemonade or iced tea, nicely complementing the bright flavors of the cake.
5. Occasion Considerations: Customize each serving according to the event—whether it’s a birthday party or casual get-together, tailor the garnishes and accompaniments accordingly.
By focusing on presentation and pairing, you elevate the entire dining experience, making the Orange Creamsicle Cake memorable for everyone involved.
Additional Tips
– Use Fresh Ingredients: For the best flavor and aroma, always opt for fresh oranges and high-quality butter.
– Cream the Butter Properly: Make sure to cream the butter and sugar until it is light and fluffy, which ensures a light cake texture.
– Zest Right: When zesting oranges, use a microplane for the finest zest, enhancing the cake’s flavor significantly.
– Keep It Level: When frosting, ensure your cake layers are level for a better presentation and easier slicing.
– Add Color: If you want a more vibrant orange hue, consider adding a few drops of food coloring to the frosting.
– Let it Rest: Allow your frosted cake to sit for about an hour before serving. This helps the flavors meld together beautifully.
Recipe Variation
Feel free to customize the Orange Creamsicle Cake with these delicious variations:
1. Vegan Option: Substitute eggs with flaxseed meal and use plant-based butter and milk for a vegan-friendly version.
2. Citrus Medley: Mix in some lemon or lime zest along with the orange zest for a unique citrus flavor.
3. Layer It Up: Create a layered cake by splitting the batter into more pans and stacking them for a dramatic presentation.
4. Frosting Flavor: Experiment with different extracts in the frosting, like almond or citrus, to give it an extra twist.
5. Mini Cakes: Bake the cake batter in muffin tins for individual servings, perfect for parties or gatherings.
Freezing and Storage
– Storage: Keep any leftover Orange Creamsicle Cake in an airtight container in the refrigerator for up to 5 days to maintain its moisture and flavor.
– Freezing: If you want to store it for longer, slice the cake and wrap each piece in plastic wrap. Then, place in a freezer bag. It can last up to 2-3 months in the freezer. When you’re ready to enjoy, thaw in the refrigerator overnight.
Special Equipment
Here are some essential tools you may need for making the Orange Creamsicle Cake:
– Mixing bowls: To combine your ingredients efficiently.
– Electric mixer: This will make creaming the butter and sugar simple and fast.
– Rubber spatula: Perfect for folding in ingredients and scraping down the sides of the bowl.
– Measuring cups and spoons: Accurate measurement ensures perfect texture and flavor.
– 9-inch round cake pans: Essential for achieving the right shape and size for your cakes.
– Wire racks: For cooling the cakes evenly before frosting.
Frequently Asked Questions
Can I use bottled orange juice instead of fresh?
While fresh orange juice is recommended for flavor intensity, bottled juice can work in a pinch. Just choose a high-quality brand.
Is it necessary to refrigerate the cake?
While not necessary, refrigerating can help the cake stay fresh longer, especially if there’s cream in the frosting.
Can I make this cake gluten-free?
Yes! Substitute the all-purpose flour with a gluten-free blend. Ensure the baking powder is gluten-free as well.
How can I add more orange flavor?
Consider adding extra grated orange zest or a splash of orange extract to the batter and frosting for more citrusy goodness.
How do I ensure my cake is moist?
Be careful not to overmix the batter and remove it from the oven as soon as a toothpick comes out clean. Also, the addition of whole milk helps retain moisture.
Conclusion
The Orange Creamsicle Cake is a delightful combination of vibrant flavors and nostalgia. It’s not only incredibly delicious but also easy to make. Perfect for any occasion, this cake will surely impress your guests and leave them wanting more. Whether you stick to the classic recipe or explore variations, every bite will remind you of sunny days and carefree moments.
Orange Creamsicle Cake: An Incredible Ultimate Recipe
- Total Time: 42 minute
Ingredients
– 2 ½ cups all-purpose flour
– 2 teaspoons baking powder
– ½ teaspoon salt
– 1 cup unsalted butter, softened
– 2 cups granulated sugar
– 4 large eggs
– 1 tablespoon grated orange zest
– 1 tablespoon vanilla extract
– 1 cup whole milk
– 1 ½ cups powdered sugar (for frosting)
– ½ cup unsweetened orange juice
– 1 cup butter, softened (for frosting)
– 2 teaspoons vanilla extract (for frosting)
– Orange slices and zest for garnish (optional)
Instructions
Creating the Orange Creamsicle Cake is straightforward if you follow these simple steps:
1. Preheat Oven: Begin by preheating your oven to 350°F (175°C). Grease and flour two 9-inch round cake pans.
2. Mix Dry Ingredients: In a bowl, whisk together the all-purpose flour, baking powder, and salt.
3. Cream Butter and Sugar: In a large mixing bowl, beat the softened butter and granulated sugar together until light and fluffy.
4. Add Eggs: Add the eggs one at a time, mixing well after each addition. Incorporate the orange zest and vanilla extract.
5. Combine Mixtures: Gradually add the dry ingredients to the butter mixture, alternating with the milk. Mix until just combined.
6. Pour Batter: Divide the cake batter evenly between the prepared pans.
7. Bake: Place the pans in the preheated oven and bake for 25-30 minutes, or until a toothpick inserted in the center comes out clean.
8. Cool: Remove the cakes from the oven and let them cool in the pans for 10 minutes. Then, transfer them to wire racks to cool completely.
9. Prepare Frosting: In a separate bowl, whip the softened butter until creamy. Gradually add powdered sugar, orange juice, and vanilla extract, mixing until smooth.
10. Frost the Cake: Once the cakes are cool, spread frosting between the layers and on top. Use a spatula to create an even layer.
11. Decorate: Garnish the cake with orange slices and additional orange zest, if desired.
By following these steps, you will create a delicious and visually stunning Orange Creamsicle Cake that everyone will enjoy.
- Prep Time: 30 minutes
- Cook Time: 25-30 minutes
Nutrition
- Serving Size: 12
- Calories: 350 kcal
- Fat: 15 g
- Protein: 4 g